|
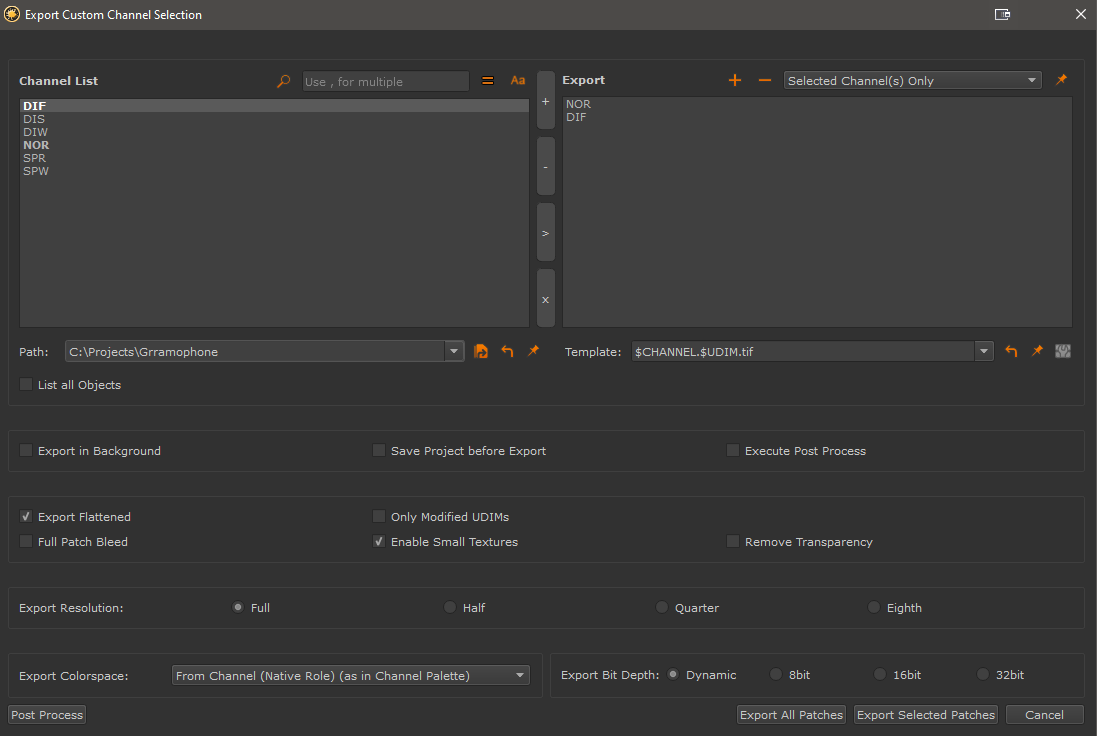
Export Custom Channel Selection |
- Where to find it:
- Channels Palette /

- Channels Palette / Right Mouse Click
- Export
- Export Flattened
- Main Window / Channels /
- Export
- Export Flattened
- Main Window / Extension Pack / Channels /
- Export
- Shortcut: SHIFT + E
- Videos
- Options
- Filtering
- Presets
- Export Modes
- Settings
- Path
- Reset Path to Default
- Set Path as Project Default
- Template
- Reset Template to Default
- Set Template as Project Default
- Configure EXR File Compression
- List All Objects
- Export in Background
- Save Project before Export
- Execute Post Process
- Export Flattened
- Only Modified UDIMs
- Full Patch Bleed
- Enable Small Textures
- Remove Alpha
- Export Resolution
- Export Color Space
- Export Bit Depth
- Post Processing
Export Custom Channel Selection is a new Export Mode available in MARI that allows you to batch export a custom list
of channels from multiple different objects.
It has all options to completely replace all other channel export modes with the addition of some
others that have not been previously available.
The Video below is from a previous Version of Extension Pack.
While some features have changed some items such as the Post Processing covered in this video
still apply to the current version:
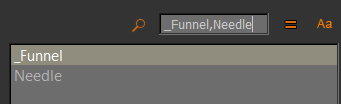
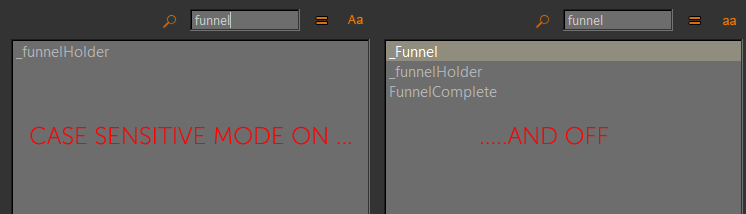
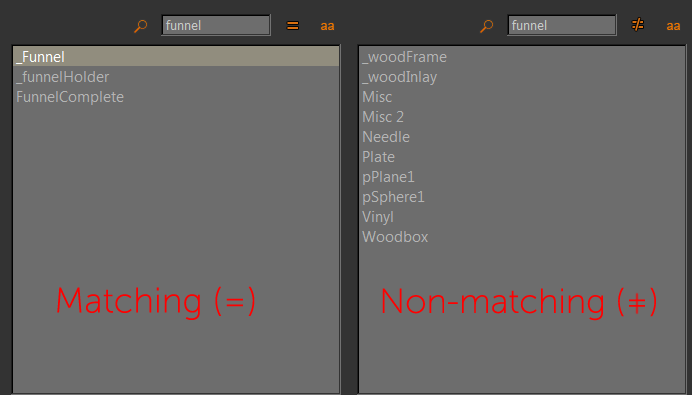
Filtering options at the top of the dialog allow you to search through the list of Channels.
- Deactivate the filter by clicking on the Magnifying Glass


- Search for multiple words by separating them with a comma (,)
- Search in Case Sensitive
 or Case Insensitive Mode
- Search for matching
 or non matching
  words
words

Presets allow you to make a snapshot of the channels added to the Channels To Export List in order to
quickly re-add the same channels again to the list at a later time.
Presets can be set as Default Presets that will automatically load when the Export Dialog is launched by
clicking the Set as Default  Icon
Icon
By default the list comes preconfigured with 4 Presets:
- Clear Export List
Will remove all Items from the Channels to Export List
- Selected Channel(s) only
Will add the currently selected channel in the channel palette to the Channels to Export List when the Export
Dialog is launched.
When the Dialog is already open and the Preset is chosen after the fact, the current selection from the left hand channel list
is added.
- Last Exported Channels
Will add the last Exported Channels to the Channels to Export List.
This is purely name based so will work across projects.
- Last Exported Channels (all objects)
Will add the last Exported Channels to the Channels to Export List.
Other than the Last Exported Channels option this will be applied to all objects.
E.g.: your last exported channel was SPECULAR, Last Exported Channels (all objects)
will add all Channels called SPECULAR from all objects to the Channels to Export List
- Export all Patches
Will export all Patches from the marked channels. Works across multiple objects if you choose to.
If Only Modified Textures Checkbox is active, only patches that have been modified since the last
export will be exported (requires at least one export with option turned on)
- Export Selected Patches
Will export only selected Patches from the marked Channels. Works across multiple objects if you choose to.
Export Selected Patches will ignore the Only Modified Textures Checkbox and force export the Selected Patches
The Export Path. This will default to the path defined as default for Exporting Textures.
You can modify standard paths with the Set Project Paths tools.
The Path Field supports creation of non-existing subfolders.
If you enter a subfolder that does not exist the tool will create it for you (after a user confirmation).
The Base Path history dropdown stores up to 10 previous paths.
The Path Field supports multiple Variables that you can put into Folder Names. The tool will create the folders
for you automatically.
- $ENTITY - Replaces the Variable with the Object Name on Export
- $CHANNEL - Replaces the Variable with the Channel Name on Export
- $LAYER - Replaces the Variable with the Layer Name on Export ('flattened' on Flattened Exports)
- $NODE - Replaces the Variable with the Graph Node you exported from
- $FRAME - Replaces the Variable with the current (Key)Frame Number on Export
- $UDIM - Replaces the Variable with the UV Identifier (UDIM) for each exported Image
- $NUMBER - The number of the file within the batch (for example, “$NUMBER of $COUNT” gives strings like “22 of 28”).
- $COUNT - The total number of files in the channel.
- $COLORSPACE - The Colorspace that was used for Export
- $[METADATA] - The value of any user-defined attributes

Reset Path will reset your path field to the default setting for Texture Exports that was set when first opening your project.
|
|
PATH HISTORY Extension Pack keeps a path history to determine Reset Path to Default behavior When using Reset Path it will restore the path to the one set on project load after any custom per-project paths from Set Project Paths had already been restored |
Set Path as Project Default will set the currently entered path as the new default path for Texture Exports.
This setting is remembered across Sessions and the new default path will be set each time you open the current project.
You can reset the path back to the previous path by using Reset Path at any time.
The Template for the File Name(s) that will be created.
If the tool was launched via Channel/Export this will default to the template defined for Layer Export,
if launched via Channel/Export Flattened this will default to the template defined for flattened Exports.
You can set default Templates via the Set Project Path Tools.
Folder creation is supported here as well so entering a string such as
mydiffuse/$CHANNEL.$UDIM.ext
would place your files in a subfolder mydiffuse/
The Template history dropdown stores up to 10 previous paths.
The Template Field supports multiple Variables that you can put into Folder Names and the File Name.
The tool will create the necessary folders for you automatically.
- $ENTITY - Replaces the Variable with the Object Name on Export
- $CHANNEL - Replaces the Variable with the Channel Name on Export
- $LAYER - Replaces the Variable with the Layer Name on Export ('flattened' on Flattened Exports)
- $NODE - Replaces the Variable with the Graph Node you exported from
- $FRAME - Replaces the Variable with the current (Key)Frame Number on Export
- $UDIM - Replaces the Variable with the UV Identifier (UDIM) for each exported Image
- $NUMBER - The number of the file within the batch (for example, “$NUMBER of $COUNT” gives strings like “22 of 28”).
- $COUNT - The total number of files in the channel.
- $COLORSPACE - The Colorspace that was used for Export
- $[METADATA] - The value of any user-defined attributes
Reset Template will reset your Template field to the default Template for Texture Exports that was set when first opening your project.
|
|
PATH HISTORY Extension Pack keeps a history to determine Reset Template to Default behavior When using Reset Template it will restore the Template to the one set on project load after any custom per-project Templates from Set Project Paths had already been restored |
Set Template as Project Default will set the currently entered Template as the new default Template for Texture Exports.
This setting is remembered across Sessions and the new default Template will be set each time you open the current project.
You can reset the Template back to the previous Template by using Reset Template at any time.

Configure EXR File Compression will allow you to set the Compression Method for .exr files.
Any setting chosen here will be respected MARI wide (even in Mari default Exports).
The Icon is grayed out when a fileformat other than .exr is specified.
By default the Channel List will only display channels from the currently selected object.
Activating the 'List all Objects' Option will show all Channels project-wide in the list.
- Export in Background
When Export in Background is on Mari will write baked channels to disc in an export process,
freeing it up to already start baking the next channel in the list
Will trigger a project save before the Export starts.
If a Post Process has been defined, it will be run after each Channel export.
Post Processing is not available when Export in Background is turned on
Will flatten your Layerstacks for export. If turned off you will export one file per udim per layer.
If the tool was launched via Channel/Export this will be off by default,
if launched via Channel/Export Flattened this will be on by default.
When on this will check if a Channel has been modified since last export.
Please note that this only works if the channels have been exported via this dialog at least once.
New Metadata is added to the Channel on first export that changes based on Channel changes.
(new paint,new layers etc.)
|
|
Only Modified Textures Export For this option to work properly, the selected channels need to have been exported at least once via the Export Custom Channel Selection Dialog with the Modified Textures Export turned on. |
Will run a Patch Bleed process during export of your channels. Please note disabling this
does not necessarily remove all Patch Bleed since Mari does apply Patch Bleed many times
while working with a channel / layerstack.
Enabling Full Patch Bleed will increase the time it takes to export a channel.
If enabled any UDIM that has not been edited and only has a constant color applied, Mari will export as a 8x8 pixel
Map. If turned off UDIMs will be exported at full resolution regardless of content.
Will strip out any Transparency from exported Channels.
This will allow you to export channels at different resolutions than they exist in your Mari project.
The original channel will not change. Available options are
- Full resolution (100%)
- Half resolution (50%)
- One quarter resolution (25%)
- One eighth resolution (12.5%)
|
|
Export Resolutions with Modified Texture Mode turned on The 'Export Modified Textures' only monitors your full sized channel. It will not register changes done via the Export Resolution Options. For Example: - You have exported a Channel at Full Resolution with 'Modified Textures' turned on. - Without making a change to the Channel you try to export it again, this time with half resolution. In this case the export will assume that nothing has changed and not export any textures. For the export to work in that case you would need to untick the 'Modified Textures' checkbox. |
Allows you to set what Colorspace to Export the selected channels in.
The default
- From Channel (Native Role) (as in Channel Palette)
will automatically set the export colorspace of each channel to be the same setting you have in your Channel Palette.
This will allow you to export channels at different Bit Depth than they exist in your Mari project.
The original channel will not change.
- Dynamic
Dynamic Mode should cover 99% of cases. Your channels are exported at the Bit Depth they are set to
in the Channel Palette unless the current channel bitdepth is incompatible with the selected file formats
e.g EXR Fileformat requires a minimum bitdepth of 16bit, JPG a maximum of 8bit
- 8 Bit
Will force the export bit depth of channels to 8bit
- 16 Bit
Will force the export bit depth of channels to 16bit
- 32 Bit
Will force the export bit depth of channels to 32bit
Post Processing allows you to specify commands or scripts that should be executed after a channel is exported.
This can be used for example to:
- rename Textures from Mari's UDIM Naming Convention to another Texture Naming Convention
- apply Mipmapping processes to exported Textures to make them ready for your renderer
- etc.
Any command that can be run via a dos prompt or shell can be executed and a variety of variables
can be passed to the command from the Custom Channel Exporter Tool.
Post Processes are setup using the Post Process Dialog accessible via a button at the bottom left
of the Export Custom Channel Selection Dialog

Post Processing is only applied to exported Channels if the 'Execute Post Process Commands' Checkbox
in the Export Custom Channel Selection Dialog has been checked:

Post processing is run on a per channel basis meaning that all files of a channel will be exported first before
the specified post process will be triggered.
Post Processes are setup using the Post Process Dialog accessible via a button at the bottom left
of the Export Custom Channel Selection Dialog:
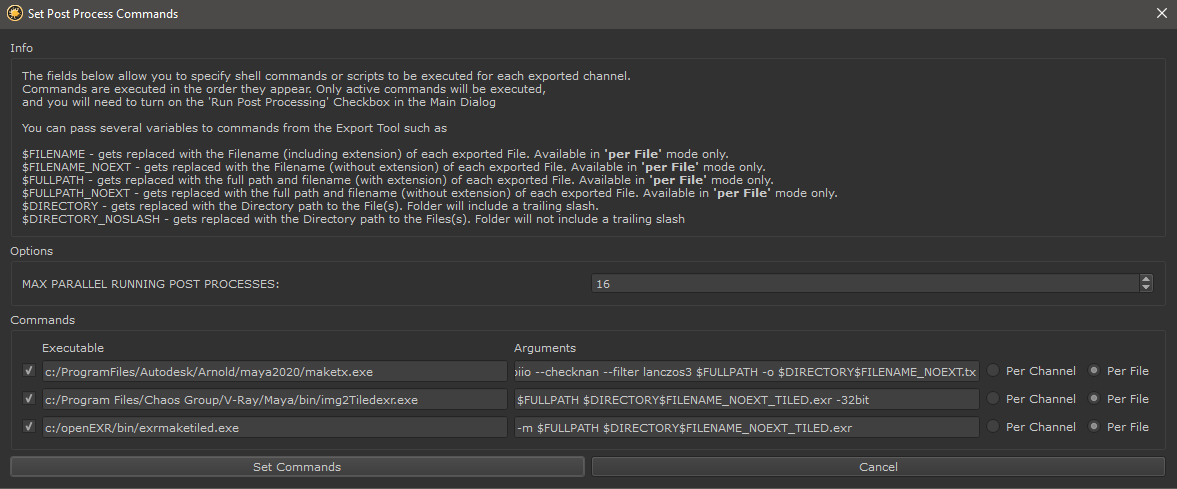
You can setup up to 3 different processes to be launched after an export.

Each process has the same UI fields
Process On/Off
Activates or deactivates a process. Please note in order to run post processes the Execute Post Processing Commands
checkbox in the Main Export Custom Channel Selection Dialog needs to be ticked as well.
Executable Field
The executable field should contain the path + filename of a program to execute such as
- C:\Program Files\Autodesk\Maya2013\mentalray\bin\imf_copy.exe
- C:\Program Files\Adobe\Adobe Photoshop CS4 (64 Bit)\Photoshop.exe
- python (to launch python scripts)
- perl (to launch perl scripts)
- etc.
Arguments Field
The Arguments field should contain any arguments or flags you want to pass to the application in the
Executable field.
You can use several placeholder variables to pass information about the exported files to a program.
Variables are case-sensitive:
- $FILENAME
If the String $FILENAME is used in the Argument field it will be replaced with the full filename of each exported Texture.
The Filename includes the File extension
The Variable is available in perFile Mode only.
Diffuse.1001.tif
Diffuse.1002.tif
.
.
- $FILENAME_NOEXT
If the String $FILENAME_NOEXT is used in the Argument field it will be replaced with the full filename of each exported Texture.
The Filename will not include the File Extension
The Variable is available in perFile Mode only.
Diffuse.1001
Diffuse.1002
.
.
- $FULLPATH
If the String $FULLPATH is used in the Argument field it will be replaced with the full path and filename of each exported Texture
The Filename includes the File Extension.
The Variable is available in perFile Mode only.
c:\temp\export\Diffuse\Diffuse.1001.tif
c:\temp\export\Diffuse\Diffuse.1002.tif
.
.
- $FULLPATH_NOEXT
If the String $FULLPATH_NOEXT is used in the Argument field it will be replaced with the full path and filename of each exported Texture
The Filename will not include the File Extension.
The Variable is available in perFile Mode only.
c:\temp\export\Diffuse\Diffuse.1001
c:\temp\export\Diffuse\Diffuse.1002
.
.
- $DIRECTORY
If the String $DIRECTORY is used in the Argument field it will be replaced with the full path of each exported Texture
c:\temp\export\Diffuse\
c:\temp\export\Diffuse\
.
.
- $DIRECTORY_NOSLASH
If the String $DIRECTORY_NOSLASH is used in the Argument field it will be replaced with the full path of each exported Texture,
without a trailing slash
c:\temp\export\Diffuse
c:\temp\export\Diffuse
.
.
Per Channel / Per File
The 'Per Channel' and 'Per File' Settings determine how many times the process is run:
Per File will execute the post process once per exported File.
If for example you are exporting a channel with 6 UDIMS the post process will be triggered 6 times.
- PER CHANNEL
Per Channel will execute the post process once per exported Channel
If for example you are exporting one channel the post process will be triggered only once (per channel) regardless of how
many UDIMS are exported.
Max Parallel running post processes:
The Max Processes Setting allows you to specify how many simultaneous Post Processes the tool is allowed to run.
This setting is useful to prevent your system from being overloaded with running post processes (think mipmapping 100 UDIMs at the same time ..)
Post Processes for each channel will be queued if the maximum count of processes is already running and the next one
will only launch once a free slot becomes available.
This setting will default to 2x your CPU count.
Converting Files to Mental Ray MAP format

Executable: c:\Program Files\Autodesk\Maya2013\mentalray\bin\imf_copy.exe
Arguments: $FULLPATH $FULLPATH_NOEXT.map
In this example the Post Process is used to automatically create .map files from the exported Textures:
- The EXECUTABLE Field contains the path to the imf_copy.exe used to create the map files.
- The Process is set to 'per File' meaning that it will be run once per exported file
- The ARGUMENTS Field contains the $FULLPATH Variable as the source file used to indicate each source file with full directory path, filename and extension. The target .map file is named dynamically by using the $FULLPATH_NOEXT Variable which gets replaced with the full directory path and filename of the exported file but without the file extension. In this case the File extension is substituted with .map.
Converting Files to different Naming Convention

Executable: perl (alias defined for c:\program files\perl\perl.exe)
Arguments: d:\textures\Maprename\maprename -s $DIRECTORY mari zb
In this example the Post Process is used to automatically convert exported textures to a different naming convention using the
- The EXECUTABLE Field contains the application to run the script in. In this case perl.exe is just called using the system alias 'perl'
- The Process is set to 'per Channel' meaning that it will be only run once at the end of each channel export (since maprename works per directory)
- The ARGUMENTS Field contains the path to the perl script (maprename), some flags to indicate source and target naming
convention (mari zb) and the $DIRECTORY Variable which will be automatically replaced with the directory path to your exported channel files.

Executable (1): C:\Program Files\Autodesk\Maya2013\mentalray\bin\imf_copy.exe
Arguments (1): $FULLPATH $DIRECTORY_NOSLASH\zbrush\$FILENAME_NOEXT.map
Executable (2): perl (alias defined for c:\program files\perl\perl.exe)
Arguments (2): d:\textures\Maprename\maprename -s $DIRECTORY_NOSLASH\zbrush\ mari zb
In this example the Post Process is used to automatically convert exported textures to .map format in a different folder,
then convert the map files to a different naming convention using the maprenamer perl script
- The EXECUTABLE (1) Field contains imf_copy.exe, used to convert the exported textures to the .map format
- The Process is set to 'per File' meaning that it will be run once per exported file
- The ARGUMENTS (1) Field contains the $FULLPATH Variable as the source file used to indicate each source file with full directory path, filename and extension.
The target .map file is named dynamically by using the $FILENAME_NOEXT Variable which gets replaced with the original Filename without Fileextension.
The target .map files ares generated in a subfolder 'zbrush' of the original folder the Textures were exported to.
The original folder location is substituted for the $DIRECTORY_NOSLASH variable which returns the path to your exported textures without
a trailing backslash.
- The EXECUTABLE (2) Field contains the application to run the script in. In this case perl.exe is just called using the system alias 'perl'
- The Process is set to 'per Channel' meaning that it will be only run once at the end of each channel export (since maprename works per directory)
- The ARGUMENTS Field contains the path to the perl script (maprename), some flags to indicate source and target naming
convention (mari zb) and the $DIRECTORY_NOSLASH Variable which returns the path to your exported textures without
a trailing backslash. The subfolder for the .map files is manually amended using \zbrush\.