|
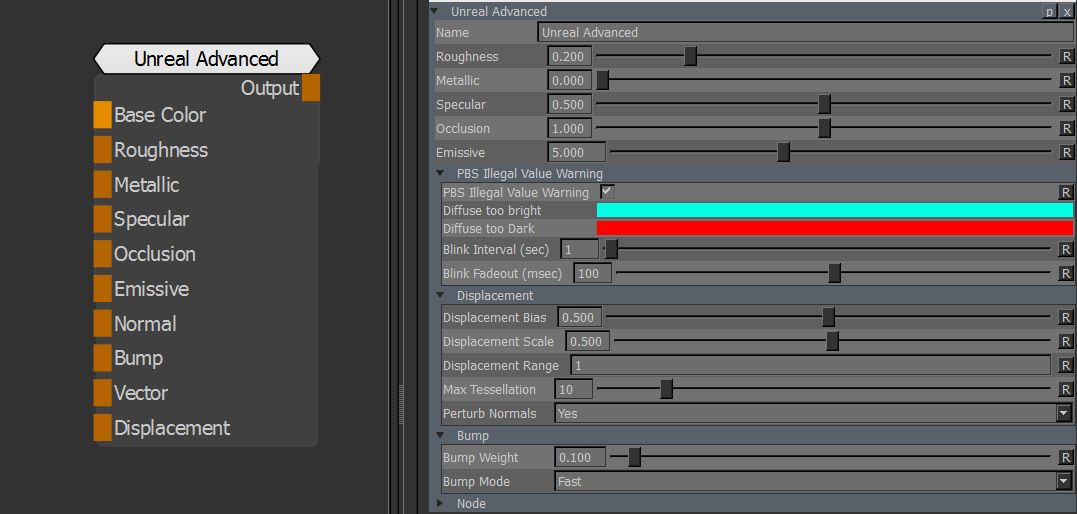
UNREAL Advanced BRDF |
- Where to find it:
- Shader Palette / Add New Shader / Lighting / Standalone
 NodeGraph / Right Mouse Click / Nodes / Shader Network / Standalone
Unreal Advanced is a BRDF Shader resembling Unreal Engine's BRDF in look and handling.
This allows for material development for Unreal Engine inside of Mari with a close result
to what you will see in-engine.
The Unreal Advanced Shader is a progression from the Unreal Shader included in Mari 3.0 with additional
features such as
- Warnings when painting illegal values that would break physically based shading
- Sliders for Values (will be overwritten when corresponding slot is mapped)
- Emissive Color
- Flat+Basic Lighting Modes will return BaseColor instead of black when metallic is 1
The Unreal Advanced Shader can automatically check if your Base Color is compatible with a
Physically Based Shading (PBS) approach and give you a visual warning for values outside the
recommended range.
Various guidelines exist to maintain energy conservation on BRDF shaders and to represent materials
correctly so they behave predictably under different light conditions:
The following checks are performed for metallic surfaces
- Base Color should have value (linear) of 0.69 - 1.0
The following checks are performed for non-metallic surfaces
- Base Color should not have (linear) values below 0.02 (tolerant) and 0.015 (strict) and (linear) values above 0.87

|
|
Input Slot vs Slider Most inputs of the 'Unreal Advanced' Shader have a corresponding slider. If the Input Slot is not mapped with a channel, this slider will be used. As soon as you map a channel to the input the value of the slider will be ignored. This does not apply to the 'Emissive' Slider. The Emissive Slider will control the glow intensity of the mapped 'Emissive' Color. |
|
Main |
- Base Color
Maps the diffuse color, i.e. the main color of the material.
- Roughness
The Roughness input literally controls how rough the Material is.
A rough Material will scatter reflected light in more directions than a smooth Material.
This can be seen in how blurry or sharp the reflection is or in how broad or tight the specular highlight is.
Roughness of 0 (smooth) is a mirror reflection and roughness of 1 (rough) is completely matte or diffuse
The Roughness Progression (samples taken from Unreal Engine Documentation)

- Metallic
The Metallic input literally controls how "metal-like" your surface will be.
Nonmetals have Metallic values of 0, metals have Metallic values of 1.
For pure surfaces, such as pure metal, pure stone, pure plastic, etc. this value will be 0 or 1, not anything in between.
When creating hybrid surfaces like corroded, dusty, or rusty metals, you may find that you need some value between 0 and 1.
The Metalness Progression (samples taken from Unreal Engine Documentation)

- Specular
Specular is a value between 0 and 1 and is used to scale the current amount of specularity for non-metallic surfaces.
It has no effect on metals. It should be left at its default value of 0.5 for most cases.
- Occlusion
Allows you to map a cavity map to your shader.
Small scale geometry, especially details only present in the high poly and baked into the normal map, will not be picked
up by the renderer's real-time shadows. To capture this shadowing, we generate a cavity map, which is typically an AO map
with very short trace distance. This is multiplied by the final BaseColor before output and multiplied with 0.5 (Specular default)
as the Specular output. To be clear this is BaseColor = Cavity*OldBaseColor, Specular = Cavity*0.5.
- Emissive
Determines which parts of your material are emissive ('glowing' in simple words).
Emissive Color will remove specular and shading from the affected areas and make it less
affected by light changes
- Normal
Tangent Space Normal Map
- Bump
Bump Map (optional)
- Vector
Maps a vector Channel. Refer to the mari online help on vector channels for more information
- Displacement
Displacement Channel
- PBS Illegal Value Warning
Turns the automatic Warning on and off
- Diffuse too bright Color
The warning color that will be used if your Diffuse/Base Color is too bright to be used correctly with physically based shading
- Diffuse too dark Color
The warning color that will be used if your Diffuse/Base Color is too dark to be used correctly with physically based shading
- Blink Interval (seconds)
Sets the time in seconds inbetween each warning blink. Set to 0 for a continuous overlay of the warning colors without blinking
- Blink Fadeout (milliseconds)
Sets the time it takes in milliseconds for the warning colors to fade out to 0.0 inbetween the blink interval
- Displacement Bias
Midpoint (0 disp) of your dispacement
- Displacement Scale
Intensity of your displacement
- Displacement Range
Intensity multiplier of your displacement
- Max Tesselation
Quality and detail of the screen space tesselation
- Perturb Normals
When on, new normals will be calculated after displacement.
- Bump Weight
Scale of your bumpmapping
- Bump Mode
Defines Accuracy vs. Performance Mode of the Bump Mapping.
