Edge Wear Presets by Jens Kafitz |
Gizmos are Nodegraph Networks that Mari can load as a single Node. MARI Extension Pack includes a variety of Gizmos to create
Edgewear effects. Each Gizmo has useful parameters exposed on its Node to quickly adjust core settings.
|
Step by Step Video A Step-by-Step Video of the Installation process can be found here |
Gizmos will not be automatically installed with MARI Extension Pack 3 R2.
You can find the Gizmos as part of the MARI Extension Pack 3 R2 Preset ZIP File you downloaded on purchase.
To install them please copy the /Presets/Mask Presets/ Folder from the ZIP File into the location of your
MARI Gizmos Folder. This is usually
If the subfolder GIZMOS does not exist on your machine, you might have to create it yourself.
Mari will load any file found as a single node you can create via the Nodegraph / Right Mouse Click / Add Nodes Menu.
In order to place a node in a submenu structure, place the Nodes in any Subfolder within a GIZMOS load directory.
The following presets are currently included with MARI Extension Pack. You can access them once installed
via the Nodegraph Right Mouse Button Menu / Add Nodes / Mask Presets / submenu.

Once installed, MARI Extension Pack 3 R2 Edge Wear Presets can be added via the Nodegraph...
The existing Presets in the Mask presets Submenu

.. resulting in a Node being added to your Graph.
A sample Edge Mask preset node

By double-clicking on the Node you will get to its Node Properties and open
the group to see the internal wiring of the node.
You can get back to your Main Nodegraph by switching back to the 'Root' Tab
at the top of the Nodegraph.
The Internal Wiring of the Preset after double clicking on it.

Each Edge Wear preset has different Attributes from the internal wiring exposed to its
Nodeproperties to facilitate quick changes without the need to go digging through the internal workings of the Preset.
You can get to the exposed Attributes via the Node properties Palette.
The exposed Attributes of the Preset seen via the Node Properties Palette.

Most MARI Extension Pack 3 R2 Edge Wear Presets require a set of input maps to work properly.
At the minimum this is usually a Curvature or Ambient Occlusion Map. Input Maps need to be attached to the exposed
Node Handles of the Preset Node (for example via Paintable Nodes or Image Nodes)
The necessary Maps can be baked inside of Mari using the internal MODO Bake (accessible via MODO Render Palette) or
brought in from an external baking solution such as XNormal, MightyBake or similar.
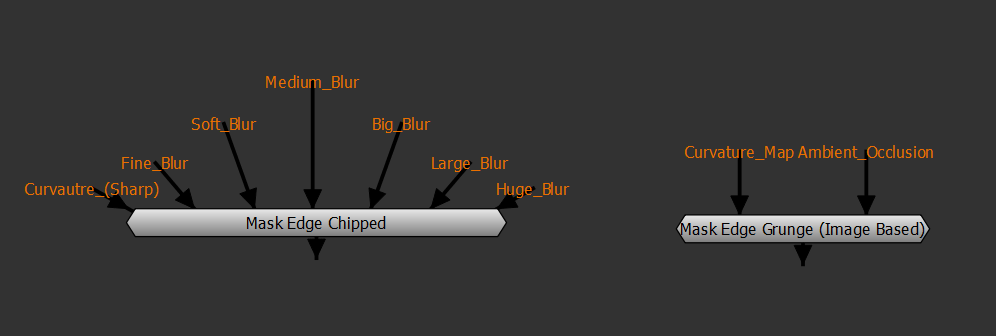
Two different presets - on the left requiring a Curvature Map and multiple variations of the Curvature Map - on the right requiring a
single Curvature Map and an Ambient Occlusion Map.

Most Curvature based effects in MARI Extension Pack 3 R2 Edge Wear Presets utilize the Mask from Curvature Node.
|
Mask from Curvature Node For best use of the Presets it is highly recommended you familiarize yourself with the Mask from Curvature Node:
|
The Node is an Image Processing Node designed to blend together different blurred Versions of a single Curvature Map.
On a lot of presets you will encounter Node Handles such as
These Node handles are used internally by the Mask from Curvature Node. For best results you are expected to create differently blurred version
of your curvature map either in Mari or in external programs such as Nuke or Photoshop.
For an in-depth step-by-step please refer to the Step-by-Step Setup of the Mask from Curvature Node.
A preset with different Maps attached

Some Edge Wear Presets labeled 'Image Based require an Input Map to be added via the Node Properties Palette.
These Input Maps can be any grunge map of your choosing, resulting in different looks to the preset.
The preset 'Mask Cavity Image Based' with two grunge maps added
into the Map slots

Maybe you changed a preset, modified some settings and wish to keep it as a separate preset for future use ?
Simply select the Preset Node (Gizmo): Right mouse click / File / Export Nodes.
If you save the File into a Gizmo Directory read by Mari, next time you start Mari it will be available from the Add Nodes Menu
Saving out a new preset

The sample archive shown below, complete with baked maps is available for download as part of your purchase.

Created with the Personal Edition of HelpNDoc: Create HTML Help, DOC, PDF and print manuals from 1 single source