|
Smart Mask Setup Tool |
- Where to find it:
- Mask Shelf - Import Smart Mask
- Mask Shelf - Pre Bake Maps
- Mask Shelf - Refresh Baked Map
- Nodegraph / Right Mouse Click / Masks / Smart Mask Setup Tool
- Main Window / Extension Pack / Nodegraph / Masks / Smart Mask Setup Tool
No matter if you use the Mask Shelf in Layer Mode or Nodegraph Mode, importing your first Smart Mask into your project requires an initial setup process.
This process needs to be done once per project.
From the second imported Smart Mask onward the setup is automatic unless you press CTRL during Import which forces open the Smart Mask Setup Tool again.
|
|
The available options in the Setup Tool can change depending on the type of imported Mask Preset |
- Setup Tool Dialog
- Baked Maps
- Baked Maps - Update Default Naming Dialog
- Other Maps
- Generated Maps
- Curvature Options
- Preferences
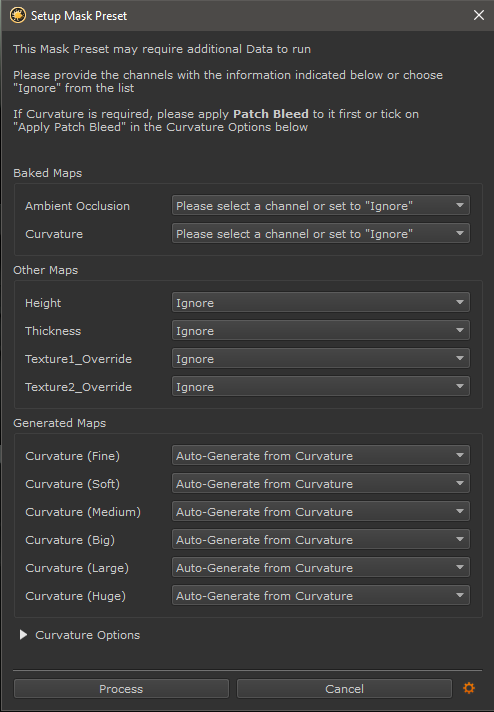
Once you either import a Mask Preset into your project or choose to pre-bake maps for later use with Smart Masks, you will be presented with the Smart Mask Setup Dialog.
Smart Mask data needs to be generated only once per project . Once generated any further import of Smart Masks will automatically connect to the already generated data unless you hold down the CTRL Button while importing, which will force-show the dialog.
|
|
Geometry updates require you to refresh the data via the Mask Shelf |
The Smart Mask Setup Dialog
|
Baked Maps |
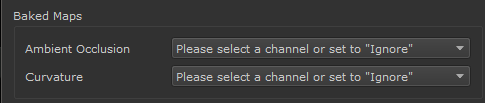
The Baked Maps are the required Maps that need to be supplied in order for the Smart Masks to work.
Usually a Ambient Occlusion and Curvature is required.
|
|
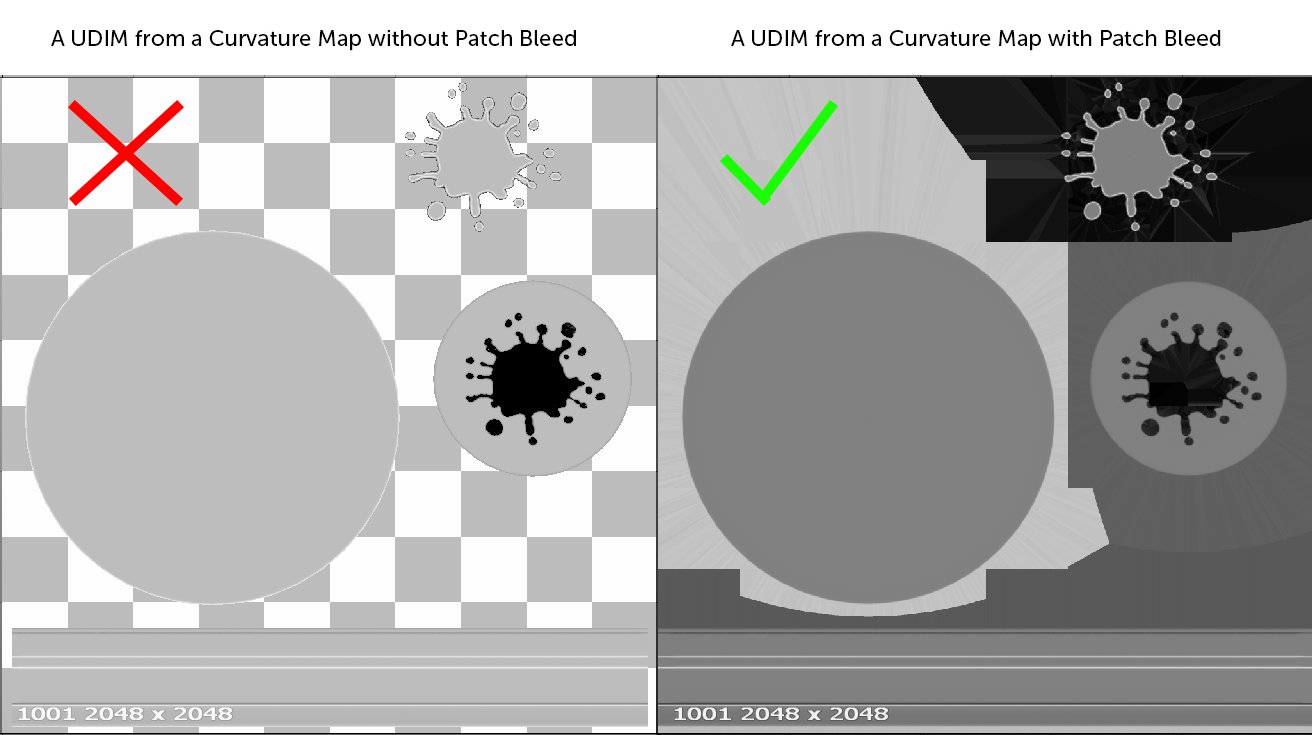
For best results ensure Curvature Maps have had Texture Dilation applied by opening the Mari Patches Menu and choosing the Bleed Patch Edges Option or ticking on the Apply Patch Bleed to Curvature in the dialogs Curvature Options |
These Maps can either be baked and imported into Mari from an external Program such as XNormal, Mightybake, Substance Painter/Designer etc.
or generated inside of Mari via the Modo Bake Palette using Extension Pack Bake Presets.
|
|
Channels for Ambient Occlusion and Curvature should always be set to linear or raw in the Mari Channel Palette |
While you can choose to set the Baked Maps to "Ignore" if you are sure the current Smart Mask does not require it, it is recommended to supply a channel so you are able to freely use any Smart Mask from the Mask Shelf.
By default the Smart Mask Setup Dialog will look for a channel called 'Ambient Occlusion' and 'Curvature Highpass' in your project.
If channels matching these names are found, the dropdowns are auto-populated to use these channels.
Your preferred Naming Convention for Channels can be set via the Smart Mask Setup Tool Preferences.
|
|
The supplied Curvature Channel is always duplicated before processing and renamed 'Curvature Sharp' to not modify the original data |
|
Baked Maps - Update Default Naming Dialog |
If your selected Channel for Ambient Occlusion or Curvature have Names that differ from the default Naming for Ambient Occlusion and Curvature Channels, a dialog will open, asking how you want to interpret the different-than-default Channel Names
The Update Default Naming Dialog
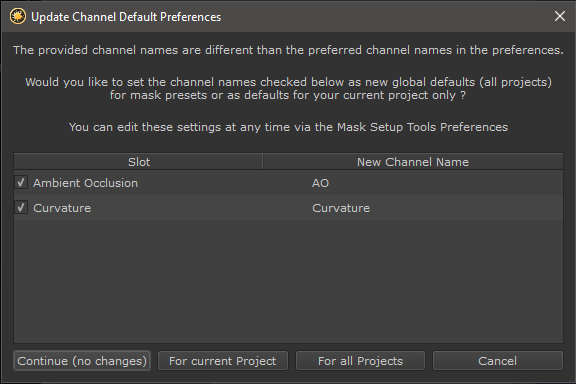
Your options are to
- Continue (no changes)
Your current Channel Selection will be taken into account for this Bake.
However the Smart Mask Setup Tool Default Naming Convention expected for Ambient Occluson and Curvature are not changed. This means the next time the dialog opens it will look again for channel names that match the default Naming Convention for those Channels
- For current Project
Your current Channel Selection will be taken into account for this Bake and the expected
default Naming Convention for Ambient Occlusion and Curvature Channels is changed for the current Project.
This means the next time the dialog opens in this project, your Ambient Occlusion and Curvature Channel are auto-detected.
- For all Projects
Your current Channel Selection will be taken into account for this Bake and the expected
default Naming Convention for Ambient Occlusion and Curvature Channels is changed for all Projects
This means the next time the dialog opens in this project or any other, your Ambient Occlusion and Curvature Channel are auto-detected as long as they match the current Channel Names chosen.
|
|
Default Naming Conventions can also be modified for all projects or only the current one in the Smart Mask Setup Tool Preferences |
|
Other Maps |
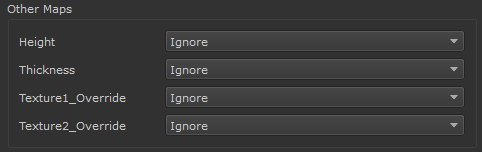
Other Maps are optional Attachments to the Smart Masks allowing you to add more/different effects
|
|
While the dialog lists these connections, they are optional. You can always afterwards manually make a connection to the appropriate ports on the Smart Mask Node via the Nodegraph or relaunch the Smart Mask Setup Tool for the selected Smart Mask via the Refresh Setup Button in the Mask Shelf |
For most Smart Masks the available options are:
- Height
Attaching a Height Channel (bump, displacement) to the Smart Mask allows you to apply a mask based on the value of the Height Map.
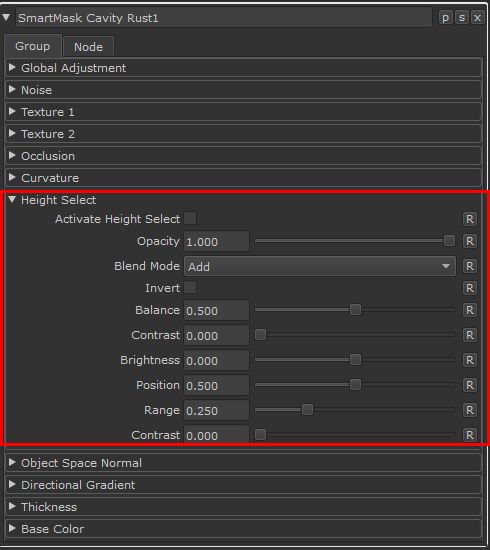
Height Channel based Masking can be controlled in the Height Select Section of Smart Mask Nodes
The Height Select Options within the Smart Mask
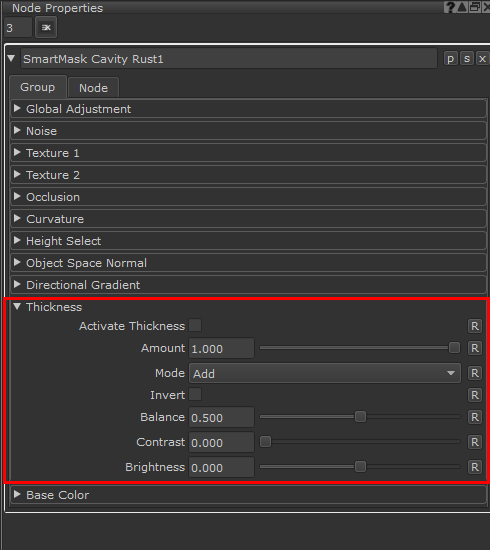
- Thickness
Attaching a Thickness Channel to the Smart Mask allows you to apply a mask based on the thickness of the Object.
Thickness Channel based Masking can be controlled in the Thickness Section of Smart Mask Nodes
|
|
Thickness Maps need to be baked in 3rd party applications and brought into Mari. Mari does not have an option to generate these Maps |
The Thickness Options within the Smart Mask
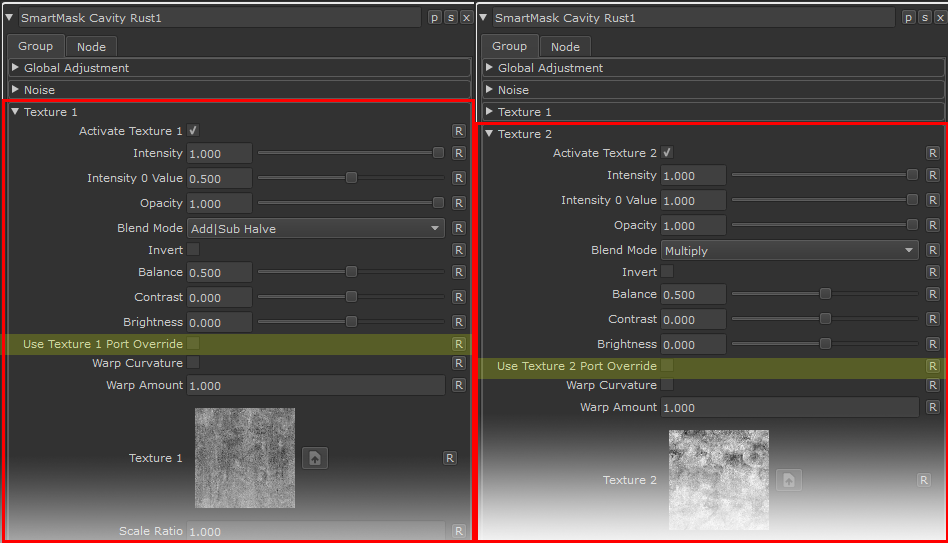
- Texture 1 Override / Texture 2 Override
The Texture 1 and Texture 2 Override Channels can be used to feed in a custom channel or connection into the Smart Mask that replaces the standard
Texture 1 or Texture 2 Options in the Smart Mask.
For Overrides to be taken into account the appropriate Use Override Checkbox in the Smart Mask needs to be ticked on.
The Use Overrides Options within the Smart Mask
|
Generated Maps |
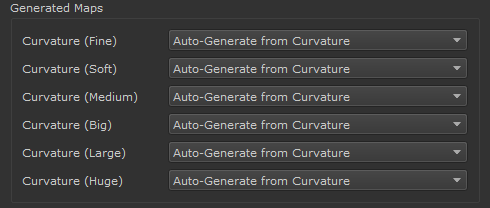
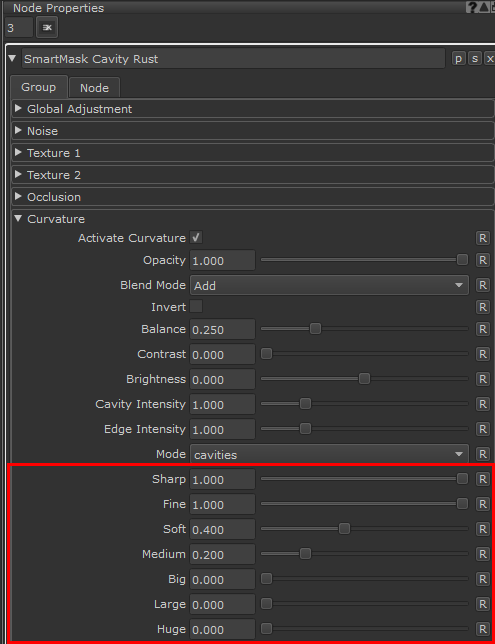
Curvature Effects in Smart Masks work by blending together different versions of a curvature map with different levels of blurring.
The Curvature Controls within Smart Mask Nodes
The Generated Maps Section of the Dialog determines if you want Extension Pack to
- Automatically Generate the Maps for you
- Use an existing Channel
- Do not generate a blurred Map (Ignore)
If you already have blurred Curvature Channels in your project that match the Naming Convention for blurred Channels defined in the Smart Mask Setup Tool Preferences
the dropdowns will be autopopulated.
|
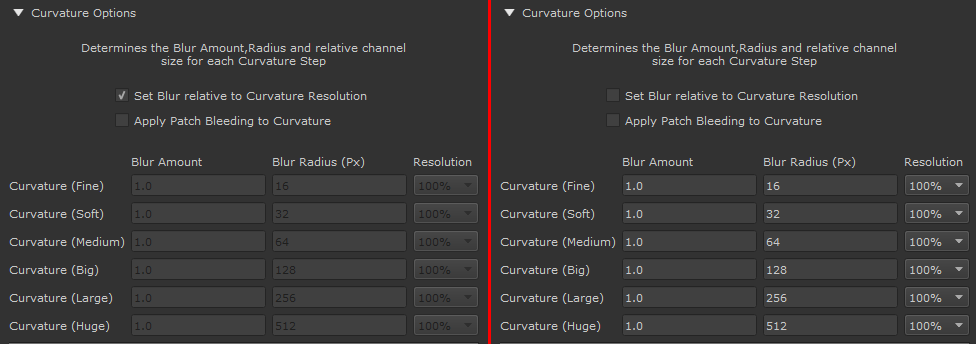
Curvature Options |
Hidden under the Curvature Options group are Attributes to configure the Generated Maps.
Generated Maps are variations of the Curvature Map supplied in the Baked Maps Section of the Dialog.
The Curvature Options let you configure the Blur Width for each generated Map.
The Curvature Options with Set Blur relative to Curvature Resolution ticked on and off
Each Variation is using a different Blur Filter Width. Within a Smart Mask you can configure the influence of each blurred Variation to achieve different edge wear effects
The Curvature Controls within Smart Mask Nodes
- Set Blur relative to Curvature Resolution
When ticked on, the input fields in the Curvature Options are disabled and auto-filled with Settings from the Smart Mask Setup Tool Preferences.
The Channel Size of the supplied Curvature Map in the Baked Maps Section of the Dialog is used to determine correct blur width settings.
- Apply Patch Bleeding to Curvature
If ticked on the supplied Curvature Map in the Baked Maps Section will receive Texture Dilation/Patch Bleeding before processing.
Patch Bleeding extends the Pixels at the borders of UV shells past the UV Shells.
This is important to avoid transparent pixels when blurring, which alters the values and can give incorrect results when using the Smart Mask Curvature Options.
- Blur and Resolution per Curvature Variation
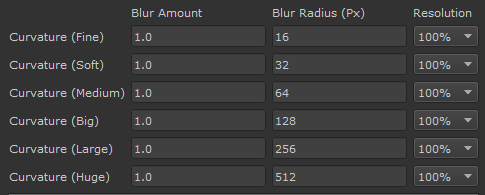
The Curvature Blur Options determine the Blur Amount and Blur Radius for each Curvature Variation Map, generated by the Tool.
- Blur Amount
The Blur Amount is the "Opacity" with which the resulting Blur is overlayed over the original Curvature Map. A value of 1.0 is usually the best for all cases
- Blur Radius (px)
The Blur Radius determines the amount of pixels around each pixel that should be blurred.
The values here are absolute pixel values, meaning that a blur radius of 200 is always only evaluating 200 pixels, resulting in a different look when applied to a
1k Curvature Channel or a 4k Curvature Channel.
- Resolution
Blurring can be a very processing expensive operation especially with high Blur Radius values required for Curvature Variation Maps Big, Large and Huge.
Depending on the Resolution of the supplied Curvature Map in the Baked Maps Section of the Dialog the necessary Blur Radius for these Curvature Variations
would be so large that computation would take an unreasonable amount of time.
The Resolution field lets you set you define a resolution in percentage of the original Curvature Channel size to generate Curvature Variations at.Since large blurs often result in far less details in a map it is often not required to maintain the original Curvature Channel resolution. For example:
- The original Curvature Channel supplied in the Baked Maps Section of the Dialog is 4096x4096 pixels.
- For optimal results in the Curvature Huge Variation usually a Blur Radius of 1024 px would be required
- By setting the Resolution of the Curvature Huge Variation to 50% the Curvature Huge Channel will be generated at 2048x2048x pixels
requiring only a Blur Radius of 512 pixels
|
Preferences |

The Smart Mask Setup Tool Preferences allow you to configure the Setup Tool to your needs.
Please refer to the Smart Mask Setup Tool Preferences Section of this help for more information